Testing Cloudflare Workers with OpenTelemetry and Tracetest
Tracetest is a testing tool based on OpenTelemetry that allows you to test your distributed application. It allows you to use data from distributed traces generated by OpenTelemetry to validate and assert if your application has the desired behavior defined by your test definitions.
Cloudflare Workers are Cloudflare's answer to AWS Lambda. They let you deploy serverless code instantly across the globe and are blazing fast. You write code and deploy it to cloud environments without the need for traditional infrastructure.
Why is this important?
Serverless architectural patterns are notoriously difficult to troubleshoot in production and complex to test across development and staging environments including integration tests.
Using OpenTelemetry in Cloudflare Workers exposes telemetry that you can use for both production visibility and trace-based testing.
This sample shows how to run tests against Cloudflare Workers using OpenTelemetry and Tracetest by:
- Testing Cloudflare Workers in your local development environment.
- Testing Cloudflare Workers in live staging and production deployments.
- Integration testing Cloudflare Workers for CI pipelines.
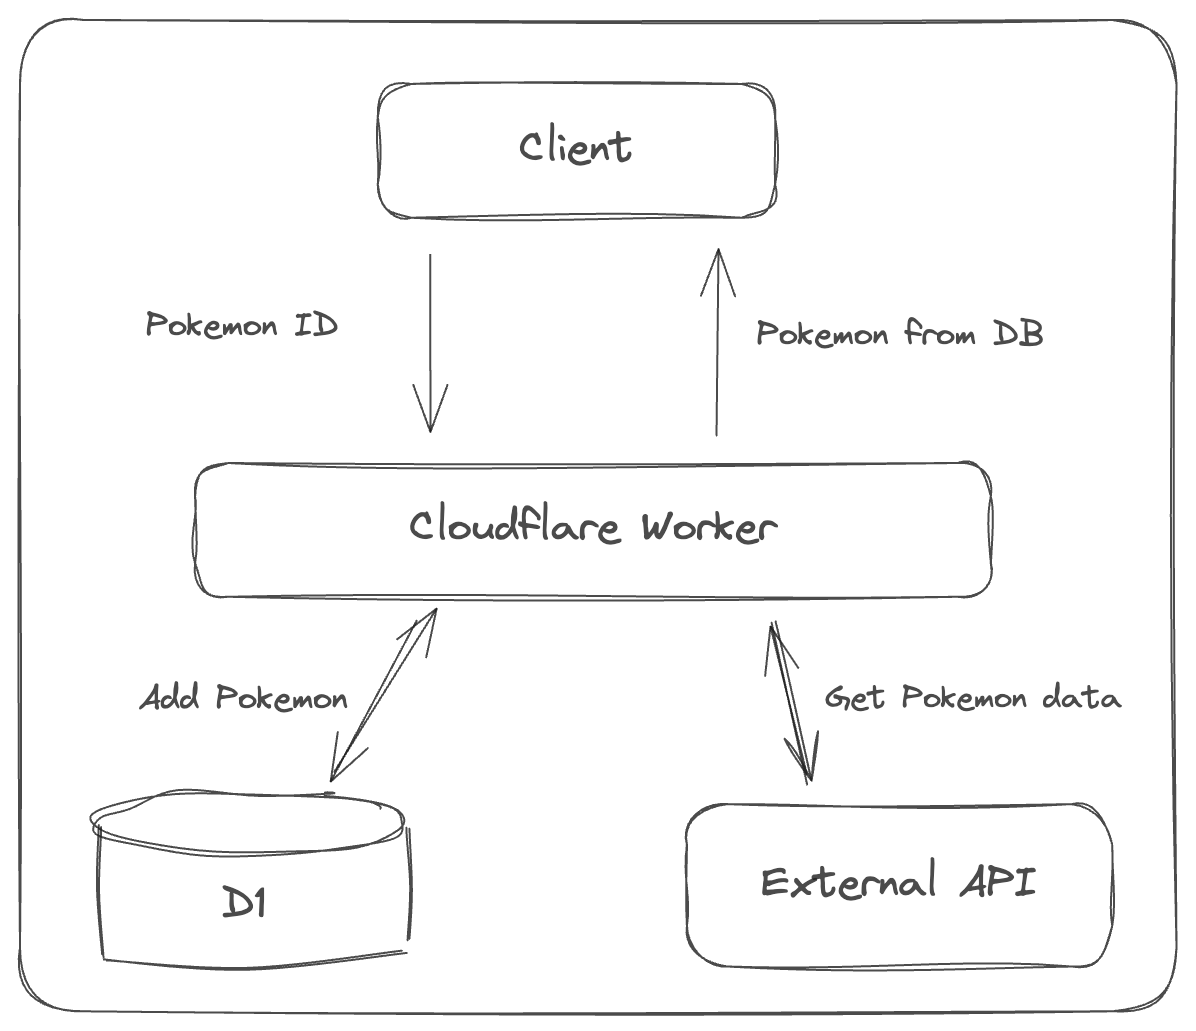
The Cloudflare Worker will fetch data from an external API, transform the data and insert it into a D1 database. This particular flow has two failure points that are difficult to test.
- Validating that an external API request from a Cloudflare Worker is successful.
- Validating that a D1 database insert request is successful.

Prerequisites
Tracetest Account
- Sign up to
app.tracetest.ioor follow the get started docs. - Create an environment.
- Create an environment token.
- Have access to the environment's agent API key.
Cloudflare Account
Cloudflare Workers Example
Clone the Tracetest GitHub Repo to your local machine, and open the Vercel example app.
git clone https://github.com/kubeshop/tracetest.git
cd tracetest/examples/testing-cloudflare-workers
Before moving forward, run npm i in the root folder to install the dependencies.
npm i
If you do not have npx installed, install it first.
npm i npx -g
Run the command to login to your Cloudflare Workers account.
npx wrangler login
Run the command to create a D1 database both locally and in your Cloudflare Workers account.
npx wrangler d1 create testing-cloudflare-workers
This will output the database_id credentials. Set them in your wrangler.toml as explained in this section below.
Run the command to create a schema in your D1 database with a schema.sql file.
DROP TABLE IF EXISTS Pokemon;
CREATE TABLE IF NOT EXISTS Pokemon (
  id INTEGER PRIMARY KEY,
  name TEXT,
  createdAt TIMESTAMP WITH TIME ZONE DEFAULT CURRENT_TIMESTAMP
);
npx wrangler d1 execute testing-cloudflare-workers --local --file=./schema.sql
npx wrangler d1 execute testing-cloudflare-workers --file=./schema.sql
Docker
Have Docker and Docker Compose installed on your machine.
Project Structure
This is a project bootstrapped with C3 (create-cloudflare-cli).
It's using Cloudflare Workers with OpenTelemetry configured with otel-cf-workers.
1. Cloudflare Worker
The Cloudflare Worker code is in src/index.ts. The docker-compose.yaml file references the Cloudflare Worker with cloudflare-worker.
2. Tracetest
The docker-compose.yaml file also has a Tracetest Agent service and an integration tests service.
Docker Compose Network
All services in the docker-compose.yaml are on the same network and will be reachable by hostname from within other services. E.g. cloudflare-worker:8787 in the test/test-api.docker.yaml will map to the cloudflare-worker service.
Cloudflare Worker
The Cloudflare Worker is a simple API, contained in the src/index.ts file.
import { trace, SpanStatusCode, diag, DiagConsoleLogger, DiagLogLevel } from '@opentelemetry/api'
import { instrument, ResolveConfigFn } from '@microlabs/otel-cf-workers'
const tracer = trace.getTracer('pokemon-api')

diag.setLogger(new DiagConsoleLogger(), DiagLogLevel.DEBUG)

export interface Env {
  DB: D1Database
	TRACETEST_URL: string
}

export async function addPokemon(pokemon: any, env: Env) {
  return await env.DB.prepare(
    "INSERT INTO Pokemon (name) VALUES (?) RETURNING *"
  ).bind(pokemon.name).all()
}

export async function getPokemon(pokemon: any, env: Env) {
  return await env.DB.prepare(
    "SELECT * FROM Pokemon WHERE id = ?;"
  ).bind(pokemon.id).all();
}

async function formatPokeApiResponse(response: any) {
  const { headers } = response
  const contentType = headers.get("content-type") || ""
  if (contentType.includes("application/json")) {
    const data = await response.json()
    const { name, id } = data

    // Add manual instrumentation
    const span = trace.getActiveSpan()
    if(span) {
      span.setStatus({ code: SpanStatusCode.OK, message: String("Pokemon fetched successfully!") })
      span.setAttribute('pokemon.name', name)
      span.setAttribute('pokemon.id', id)
    }

    return { name, id }
  }
  return response.text()
}

const handler = {
	async fetch(request: Request, env: Env, ctx: ExecutionContext): Promise<Response> {
    try {
      const { pathname, searchParams } = new URL(request.url)

      // Import a Pokemon
      if (pathname === "/api/pokemon" && request.method === "POST") {
        const queryId = searchParams.get('id')
        const requestUrl = `https://pokeapi.co/api/v2/pokemon/${queryId || '6'}`
        const response = await fetch(requestUrl)
        const resPokemon = await formatPokeApiResponse(response)

        // Add manual instrumentation
        return tracer.startActiveSpan('D1: Add Pokemon', async (span) => {
          const addedPokemon = await addPokemon(resPokemon, env)

          span.setStatus({ code: SpanStatusCode.OK, message: String("Pokemon added successfully!") })
          span.setAttribute('pokemon.name', String(addedPokemon?.results[0].name))
          span.end()

          return Response.json(addedPokemon)
        })
      }

      return new Response("Hello Worker!")
    } catch (err) {
      return new Response(String(err))
    }
	},
}

const config: ResolveConfigFn = (env: Env, _trigger) => {
  return {
    exporter: {
      url: env.TRACETEST_URL,
      headers: { },
    },
		service: { name: 'pokemon-api' },
	}
}

export default instrument(handler, config)
The OpenTelemetry tracing is included with the otel-cf-workers module. Traces will be sent to the Tracetest Agent as configured in the wrangler.toml.
name = "pokemon-api"
main = "src/index.ts"
compatibility_date = "2023-12-18"
compatibility_flags = [ "nodejs_compat" ]

# Set the IP to make the Cloudflare Worker available in Docker containers
[dev]
ip = "0.0.0.0"
port = 8787
local_protocol = "http"

# Development
[env.dev]
name = "pokemon-api-dev"
main = "src/index.ts"
compatibility_date = "2023-12-18"
compatibility_flags = [ "nodejs_compat" ]
d1_databases = [
  { binding = "DB", database_name = "testing-cloudflare-workers", database_id = "<YOUR_DATABASE_ID>" },
]
[env.dev.vars]
TRACETEST_URL = "http://localhost:4318/v1/traces"

# Prod
[env.prod]
name = "pokemon-api"
main = "src/index.ts"
compatibility_date = "2023-12-18"
compatibility_flags = [ "nodejs_compat" ]
workers_dev = true
d1_databases = [
  { binding = "DB", database_name = "testing-cloudflare-workers", database_id = "<YOUR_DATABASE_ID>" },
]
[env.prod.vars]
TRACETEST_URL = "https://<YOUR_TRACETEST_AGENT_URL>.tracetest.io:443/v1/traces"

# Docker
[env.docker]
name = "pokemon-api-docker"
main = "src/index.ts"
compatibility_date = "2023-12-18"
compatibility_flags = [ "nodejs_compat" ]
d1_databases = [
  { binding = "DB", database_name = "testing-cloudflare-workers", database_id = "<YOUR_DATABASE_ID>" },
]
[env.docker.vars]
TRACETEST_URL = "http://tracetest-agent:4318/v1/traces"

# D1
[[d1_databases]]
binding = "DB" # i.e. available in your Worker on env.DB
database_name = "testing-cloudflare-workers"
database_id = "<YOUR_DATABASE_ID>"
Set up Environment Variables
Edit the wrangler.toml file. Add your D1 and Tracetest env vars.
[env.prod.vars]
TRACETEST_URL = "https://<YOUR_TRACETEST_AGENT_URL>.tracetest.io:443/v1/traces"

[[d1_databases]]
binding = "DB" # i.e. available in your Worker on env.DB
database_name = "testing-cloudflare-workers"
database_id = "<YOUR_DATABASE_ID>"
Start the Cloudflare Worker
npx wrangler dev --env dev

# or:
# npm run dev
This starts the worker on http://localhost:8787/ and it will listen for POST requests on path /api/pokemon.
Testing the Cloudflare Worker Locally
Download the CLI for your operating system.
The CLI is bundled with Tracetest Agent that runs in your infrastructure to collect responses and traces for tests.
To start Tracetest Agent add the --api-key from your environment.
tracetest start --api-key YOUR_AGENT_API_KEY
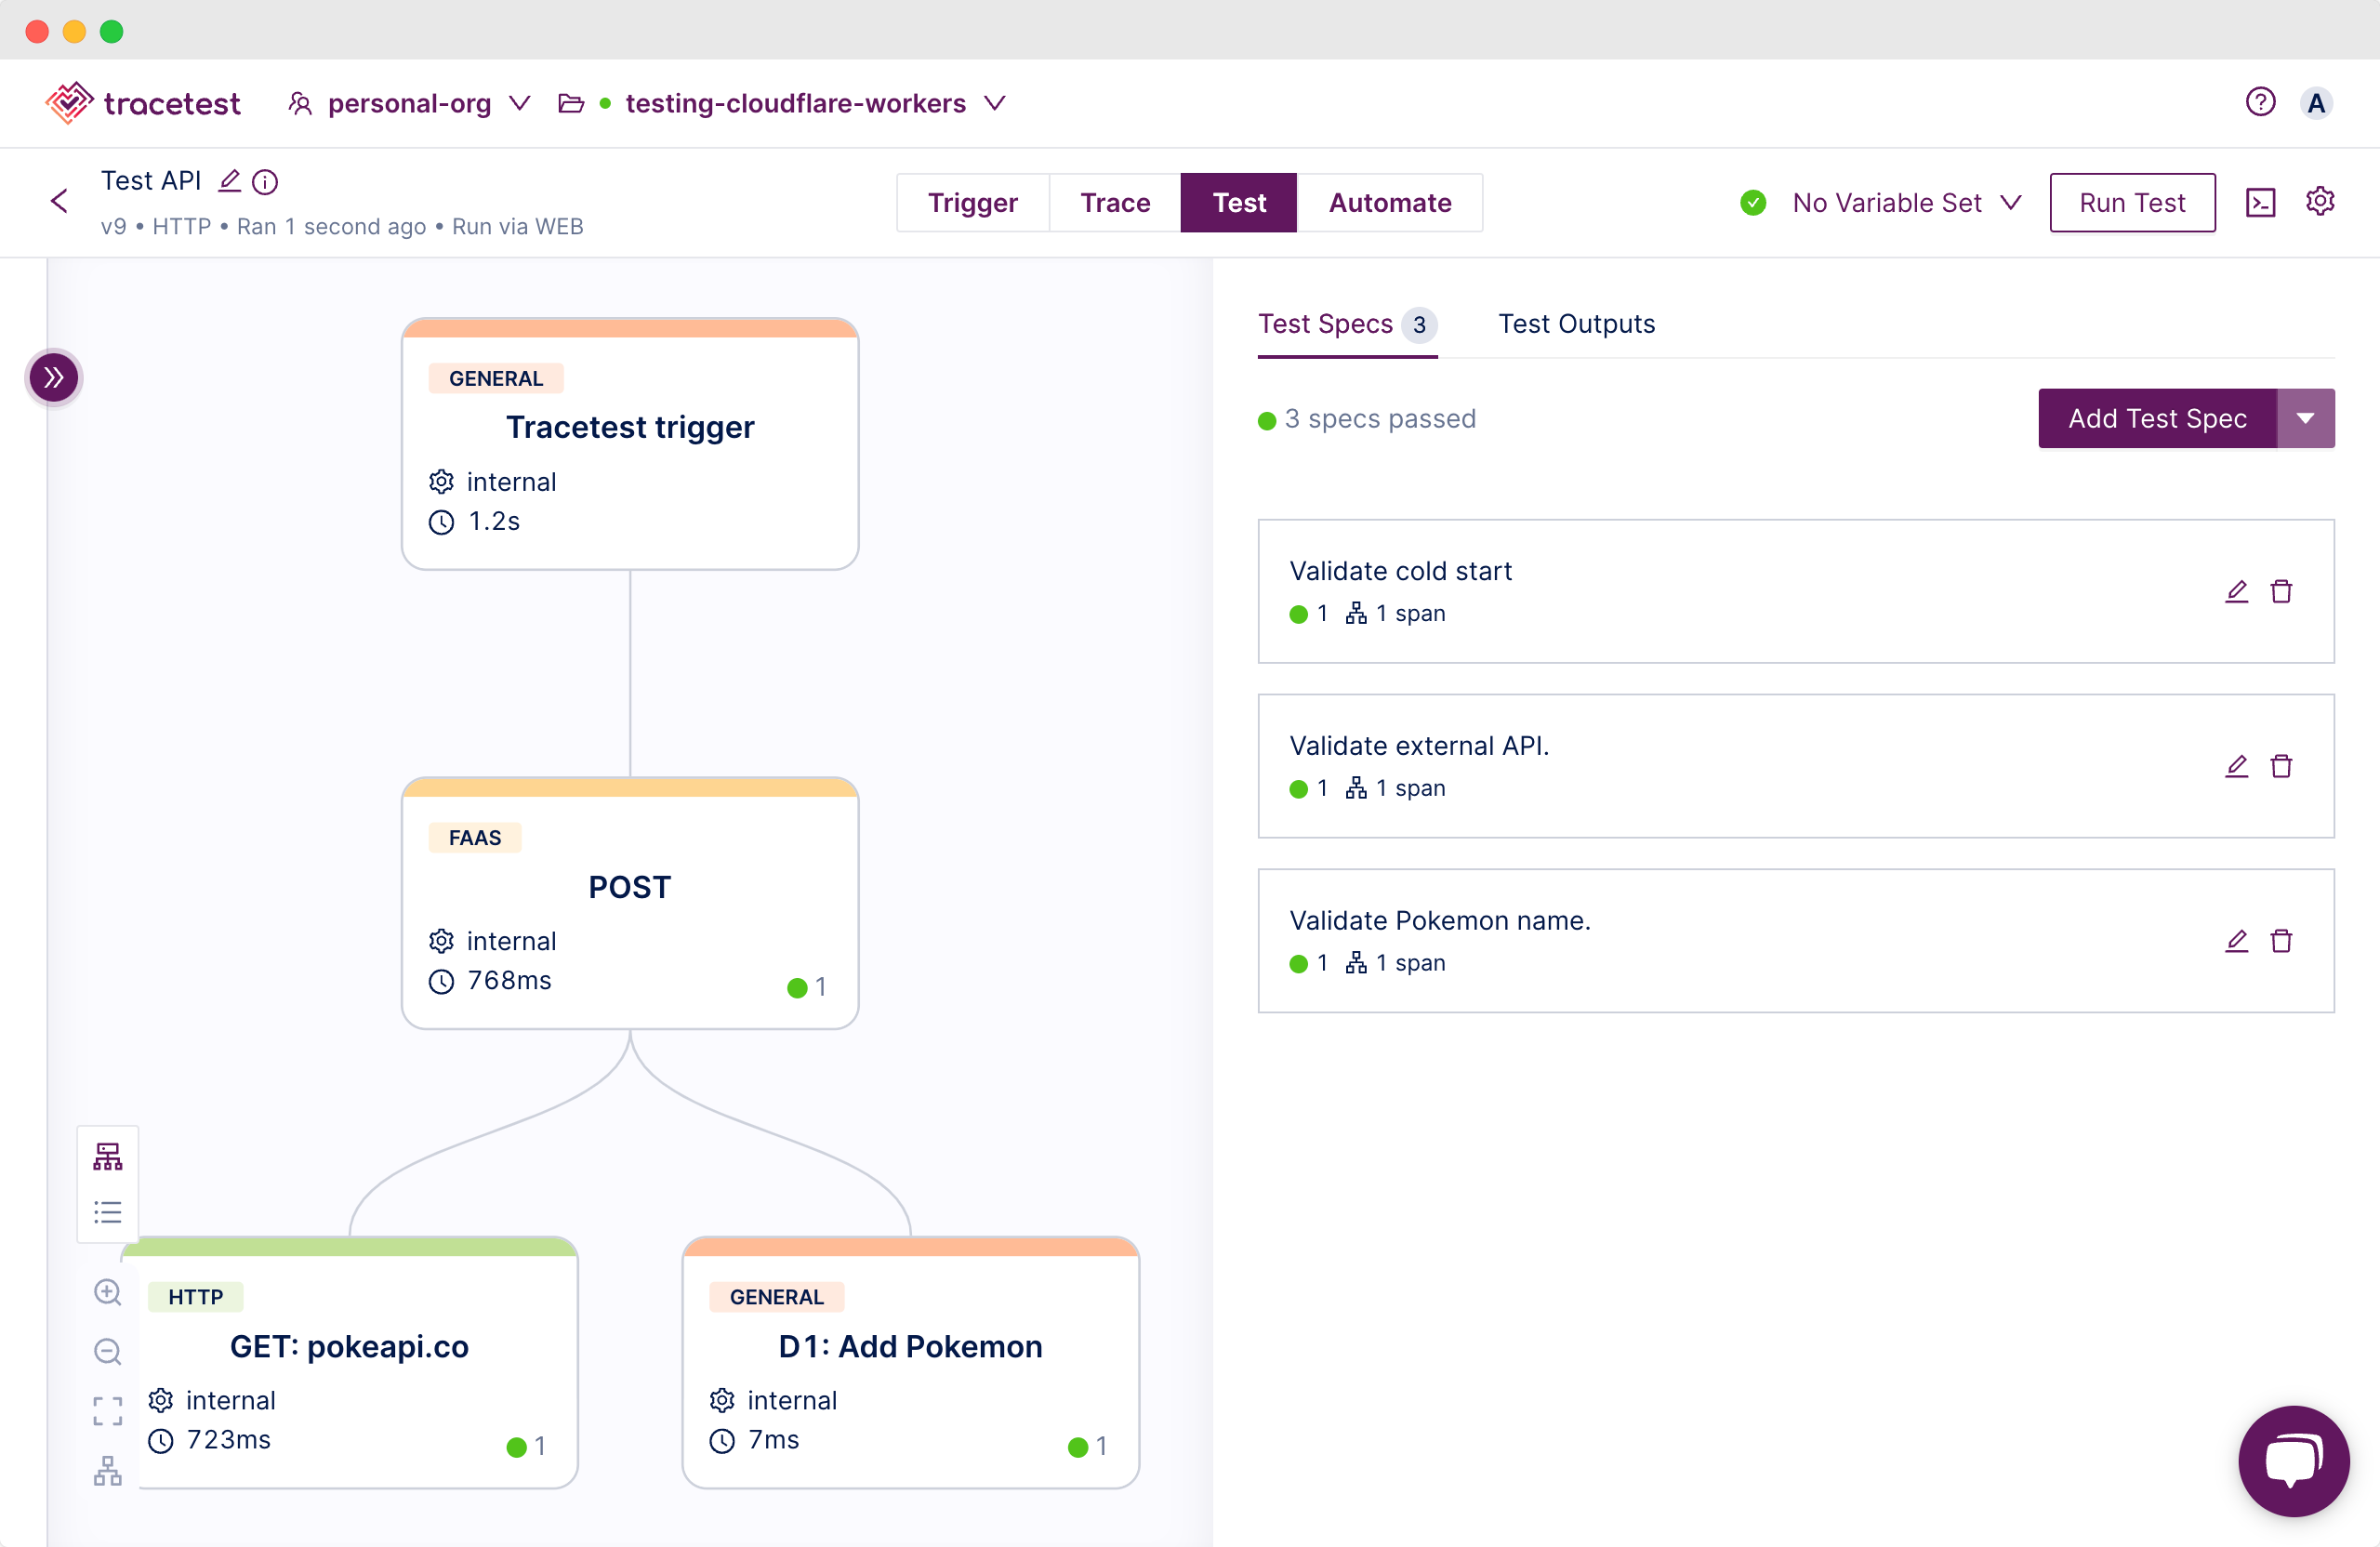
Run a test with the test definition test/test-api.development.yaml.
type: Test
spec:
  id: WMGTfM2Sg
  name: Test API
  trigger:
    type: http
    httpRequest:
      method: POST
      url: http://localhost:8787/api/pokemon?id=13
      headers:
      - key: Content-Type
        value: application/json
  specs:
  - selector: span[tracetest.span.type="faas" name="POST" faas.trigger="http"]
    name: Validate cold start
    assertions:
    - attr:faas.coldstart = "false"
  - selector: "span[tracetest.span.type=\"http\" name=\"GET: pokeapi.co\"]"
    name: Validate external API.
    assertions:
    - attr:http.response.status_code = 200
  - selector: "span[tracetest.span.type=\"general\" name=\"D1: Add Pokemon\"]"
    name: Validate Pokemon name.
    assertions:
    - attr:pokemon.name = "weedle"
tracetest run test -f ./test/test-api.development.yaml --required-gates test-specs --output pretty

[Output]
✘ Test API Prod (https://app.tracetest.io/organizations/<YOUR_ORG>/environments/<YOUR_ENV>/test/WMGTfM2Sg/run/1/test) - trace id: 59775e06cd96ee0a3973fa924fcf587a
	✘ Validate cold start
		✘ #2cff773d8ea49f9c
			✘ attr:faas.coldstart = "false" (true) (https://app.tracetest.io/organizations/<YOUR_ORG>/environments/<YOUR_ENV>/test/WMGTfM2Sg/run/1/test?selectedAssertion=0&selectedSpan=2cff773d8ea49f9c)
	✔ Validate external API.
		✔ #d01b92c183b45433
			✔ attr:http.response.status_code = 200 (200)
	✔ Validate Pokemon name.
		✔ #12443dd73de11a68
			✔ attr:pokemon.name = "weedle" (weedle)

	✘ Required gates
		✘ test-specs
Testing the Clodflare Worker in Staging and Production
Select to run the Tracetest Agent in the Cloud. OpenTelemetry will be selected as the default tracing backend. You'll find the OTLP endpoint to send traces to.
Copy the HTTP URL and paste it in the wrangler.toml and append v1/traces to the end of the Tracetest URL.
# Production
[env.prod]
name = "pokemon-api"
main = "src/index.ts"
compatibility_date = "2023-12-18"
compatibility_flags = [ "nodejs_compat" ]
workers_dev = true
d1_databases = [
  { binding = "DB", database_name = "testing-cloudflare-workers", database_id = "<YOUR_DATABASE_ID>" },
]
[env.prod.vars]
TRACETEST_URL = "https://<YOUR_TRACETEST_AGENT_URL>.tracetest.io:443/v1/traces"
Deploy the Cloudflare Worker.
npx wrangler deploy --env prod

# or
# npm run deploy
Run a test with the test definition test/test-api.prod.yaml. Replace the Cloudflare Worker URL with your endpoint.
type: Test
spec:
  id: WMGTfM2Sg
  name: Test API Prod
  trigger:
    type: http
    httpRequest:
      method: POST
      url: https://pokemon-api.<YOUR_URL>.workers.dev/api/pokemon?id=13
      headers:
      - key: Content-Type
        value: application/json
  specs:
  - selector: span[tracetest.span.type="faas" name="POST" faas.trigger="http"]
    name: Validate cold start
    assertions:
    - attr:faas.coldstart = "false"
  - selector: "span[tracetest.span.type=\"http\" name=\"GET: pokeapi.co\"]"
    name: Validate external API.
    assertions:
    - attr:http.response.status_code = 200
  - selector: "span[tracetest.span.type=\"general\" name=\"D1: Add Pokemon\"]"
    name: Validate Pokemon name.
    assertions:
    - attr:pokemon.name = "weedle"
tracetest run test -f ./test/test-api.prod.yaml --required-gates test-specs --output pretty

[Output]
✘ Test API Prod (https://app.tracetest.io/organizations/<YOUR_ORG>/environments/<YOUR_ENV>/test/WMGTfM2Sg/run/1/test) - trace id: 59775e06cd96ee0a3973fa924fcf587a
	✘ Validate cold start
		✘ #2cff773d8ea49f9c
			✘ attr:faas.coldstart = "false" (true) (https://app.tracetest.io/organizations/<YOUR_ORG>/environments/<YOUR_ENV>/test/WMGTfM2Sg/run/1/test?selectedAssertion=0&selectedSpan=2cff773d8ea49f9c)
	✔ Validate external API.
		✔ #d01b92c183b45433
			✔ attr:http.response.status_code = 200 (200)
	✔ Validate Pokemon name.
		✔ #12443dd73de11a68
			✔ attr:pokemon.name = "weedle" (weedle)

	✘ Required gates
		✘ test-specs
Integration Testing the Cloudflare Worker
Edit the docker-compose.yaml in the root directory. Add your TRACETEST_API_KEY.
  # [...]
  tracetest-agent:
    image: kubeshop/tracetest-agent:latest
    environment:
      - TRACETEST_API_KEY=ttagent_<api_key> # Find the Agent API Key here: https://docs.tracetest.io/configuration/agent
    ports:
      - 4317:4317
      - 4318:4318
    command: ["--mode", "verbose"]
    networks:
      - tracetest
Edit the run.bash. Add your TRACETEST_API_TOKEN.
#/bin/bash

# Find the API Token here: https://docs.tracetest.io/concepts/environment-tokens
tracetest configure -t <YOUR_TRACETEST_API_TOKEN> # add your token here
tracetest run test -f ./test-api.docker.yaml --required-gates test-specs --output pretty
# Add more tests here! :D
Now you can run the Vercel function and Tracetest Agent!
docker compose up -d --build
And, trigger the integration tests.
docker compose run integration-tests

[Ouput]
[+] Creating 1/0
 ✔ Container integration-testing-vercel-functions-tracetest-agent-1  Running                                                                                             0.0s
 SUCCESS  Successfully configured Tracetest CLI
✔ Test API Docker (https://app.tracetest.io/organizations/<YOUR_ORG>/environments/<YOUR_ENV>/test/p00W82OIR/run/8/test) - trace id: d64ab3a6f52a98141d26679fff3373b6
  ✘ Validate cold start
      ✘ #2cff773d8ea49f9c
        ✘ attr:faas.coldstart = "false" (true) (https://app.tracetest.io/organizations/<YOUR_ORG>/environments/<YOUR_ENV>/test/WMGTfM2Sg/run/1/test?selectedAssertion=0&selectedSpan=2cff773d8ea49f9c)
    ✔ Validate external API.
      ✔ #d01b92c183b45433
        ✔ attr:http.response.status_code = 200 (200)
    ✔ Validate Pokemon name.
      ✔ #12443dd73de11a68
        ✔ attr:pokemon.name = "weedle" (weedle)

    ✘ Required gates
      ✘ test-specs

Learn More
Feel free to check out our examples in GitHub and join our Slack Community for more info!